 Useful couple of tutorials from Character designer Jonathan Rush. First one is about creating textures using photoshop. The second is about creating decent geometry to achieve good deformation in your character mesh.
 Friday, 16 April 2010
Mesh/Texturing Tutorial
Useful couple of tutorials from Character designer Jonathan Rush. First one is about creating textures using photoshop. The second is about creating decent geometry to achieve good deformation in your character mesh. 
Friday, 2 April 2010
Building a mesh using Curves and Birails
Right, I have started playing around with the few of the techniques introduced in a previous post and taken screenshots along the way:

The first step I took was to create a rough profile of the model by creating curves and resizing them in the relevant orthographic view to achieve the bodyshape. I am not using imge planes in this instance, the purpose of this exercise is not to stringently follow a shape but to create a two legged character that has good edge flow and smooth interpolation between points. And to do this using Nurbs. I will be converting this to poly's at the end but I want to use the powerful curve diting capabilities to achive that smooth hard edged look.

Next step was to connect up the curves. Bearing in mind the Topology should consist of four sided shapes I used the Edit Point (EP) curve tool to establish the flow. I displayed the edit points on the curves which gave me a visual reference of division points on the curve. This is a massive advantae because I can now see precisely where ponts such as the halfway point etc are aln the curves and figure outhow they need to connect in relation to each other. The rebuild curve option allows me to add and subtract spans whilst maintaining perfect spacing, rather than pushing and pulling verts around by eye like you would when poly modeling.
 Close up of the proposed topology. This method allows superior interpolation between points asa bi-cubic spline will adjust the two points top and bottom side of the control vert you are pulling about.
Next step is to break apart all the curves so they are individuals. This is easily done by using the CutCurve tool (under Edit Curves menu). Now the cage is ready for the birail tool. As you can prably see there are a few issues with consistency regardiong the edit points but that can easily be corrected using the rebuild curve option.
 I've started to create the patches using the Birail 2 tool which works by selecting two profile curves and two rail curves and then effectively lofting a smooth surface between them. The Birail'd surface still has history connecting it with the curve, so if you move the edit points of the initial curve around the surface will deform with it. Very useful indeed!

Next step is to break apart all the curves so they are individuals. This is easily done by using the CutCurve tool (under Edit Curves menu). Now the cage is ready for the birail tool. As you can prably see there are a few issues with consistency regardiong the edit points but that can easily be corrected using the rebuild curve option.


I've gone around the mesh and Birail'd all the curve and created the shape I was after. In some places where the patches are a little stretched a bit of pinching has occured, and the whole thing looks a little faceted because it is made out of seperate patches. This will be overcome in the next stage where I can begin to attach patches together and begin th rebuilding process.
Wednesday, 31 March 2010
Facial muscles
Hyperlink
 Nice diagram of the facial muscle structure. Very important to have a good grasp of this because it determines how the topology should be arranged to allow for realistic deformations and facial expressions. Good topology is always defined by the lines proximity to muscular flow. If the character is an animal then the topology should follow its biological makeup, unless it is anthropomorphised then its down to the artist discretion to create a blend.
Anthropomorphism
 On the subject of Anthropomorphism, here's a series of videos with drawing techniques for drawing animals.
Nice diagram of the facial muscle structure. Very important to have a good grasp of this because it determines how the topology should be arranged to allow for realistic deformations and facial expressions. Good topology is always defined by the lines proximity to muscular flow. If the character is an animal then the topology should follow its biological makeup, unless it is anthropomorphised then its down to the artist discretion to create a blend.Anthropomorphism
On the subject of Anthropomorphism, here's a series of videos with drawing techniques for drawing animals.
Tuesday, 30 March 2010
Nurbs modeling info
Click Image for link
Cg Society Forum
 Forum I found asking the very question. Seems the juries out on the nurbs vs. polygons debate, although it does appear the majority tend to go with polygons. What is interesting is those who claim modelling with nurbs gives greater control over the mesh.
Creativecrash
 Patch modeling. This walkthrough tutorial describes the Nurbs modeling process as "popular" and goes as far as saying it is used thoughout the film industry. Also says that providing isoparms are evenly spaced (which can be achieved by rebuilding curves) 3d paint tool can be applied straight to it. Workflow can be a little slower than poly modeling but this can be overcome with sufficient practice.
Creativecrash
 Similar to the above tut. but in this case they use a loft to create the patches from lateral curves. Not really keen on this method because it uses fillets to blend facial components like the eye sockets and ears to the face. This can cause major problems when it comes to animating as it can slow down the processor and reveal inevitable gaps between the joins. Seems like a bit of a difficult and unintuitive way of doing things because there are no profile curves to help judge the facial proportions.
Very useful diagram of the face with all its muscular anatomy. I'll probably put this up as a post of its own in the near future.
Loughborough University School of Art & Design IT Video Tutorials and Tip Website
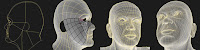 This is a fantastic resource - hours of free tutorials that walk you through the nurbs modeling pipeline. The tutor in this instance begins the head modeling process by constructing a number of EP curves that depict its features. He then use the bi-rail 2 tool to construct the patches and goes through a series of attaching/detaching and rebuilding of the surfaces. Modeling with curves offers a huge advantage of providing automatic interpolation between points when you move them - the computer will maintain the smooth lines.
What I also like about this is the ease of edgeflow. Once the curve mesh had been created, the curves were cut up where they intersected one another. He then simply rebuilt their edit poits so the numbers of spans matched up. The main difference here is you have to carefuly plan the edgeflow prior to modeling, but once you have that blueprint, you can't really fall off, providing you let the computer do the work.
Digital Tutors
 Forum from the Digital Tutors wesite. The initial question refers to one of their modeling tutorials where they create a fish character from a nurbs loft and apply a global stitch to attach the fins to the body with correct tangency. The final comment on the discussion is authored by Papa himself (who originally created the tutorial) and concludes he prefers the polygon/sub-d workflow.
What always seems apparent is the level of ambiguity concerned with nurbs modeling - nobody seems to quite understand what is going on and how procedural steps affect the mesh - a dangerous trap to fall into when following tutorials. I have been trawling the internet in vain for substantial tutorials on Nurbs modeling. There is the odd bit of basics on youtube but nothing substantial, unless you are fluent in Arabic...
suite101.com
 This article highlights the merits of polygon modeling but also illustrates how nurbs modeling can be a beneficial approach - especially when modeling organic entities. Nurbs use less geometry without becoming faceted when zoomed in on. According to this article, spline or patch based modeling makes animation and controling its deformation easier because you don't have any issues of unwanted weighting being allocated to incorrect cv's.
Cg Society Forum
Forum I found asking the very question. Seems the juries out on the nurbs vs. polygons debate, although it does appear the majority tend to go with polygons. What is interesting is those who claim modelling with nurbs gives greater control over the mesh. Creativecrash
Patch modeling. This walkthrough tutorial describes the Nurbs modeling process as "popular" and goes as far as saying it is used thoughout the film industry. Also says that providing isoparms are evenly spaced (which can be achieved by rebuilding curves) 3d paint tool can be applied straight to it. Workflow can be a little slower than poly modeling but this can be overcome with sufficient practice.Creativecrash
Similar to the above tut. but in this case they use a loft to create the patches from lateral curves. Not really keen on this method because it uses fillets to blend facial components like the eye sockets and ears to the face. This can cause major problems when it comes to animating as it can slow down the processor and reveal inevitable gaps between the joins. Seems like a bit of a difficult and unintuitive way of doing things because there are no profile curves to help judge the facial proportions. Very useful diagram of the face with all its muscular anatomy. I'll probably put this up as a post of its own in the near future.
Loughborough University School of Art & Design IT Video Tutorials and Tip Website
This is a fantastic resource - hours of free tutorials that walk you through the nurbs modeling pipeline. The tutor in this instance begins the head modeling process by constructing a number of EP curves that depict its features. He then use the bi-rail 2 tool to construct the patches and goes through a series of attaching/detaching and rebuilding of the surfaces. Modeling with curves offers a huge advantage of providing automatic interpolation between points when you move them - the computer will maintain the smooth lines. What I also like about this is the ease of edgeflow. Once the curve mesh had been created, the curves were cut up where they intersected one another. He then simply rebuilt their edit poits so the numbers of spans matched up. The main difference here is you have to carefuly plan the edgeflow prior to modeling, but once you have that blueprint, you can't really fall off, providing you let the computer do the work.
Digital Tutors
Forum from the Digital Tutors wesite. The initial question refers to one of their modeling tutorials where they create a fish character from a nurbs loft and apply a global stitch to attach the fins to the body with correct tangency. The final comment on the discussion is authored by Papa himself (who originally created the tutorial) and concludes he prefers the polygon/sub-d workflow.What always seems apparent is the level of ambiguity concerned with nurbs modeling - nobody seems to quite understand what is going on and how procedural steps affect the mesh - a dangerous trap to fall into when following tutorials. I have been trawling the internet in vain for substantial tutorials on Nurbs modeling. There is the odd bit of basics on youtube but nothing substantial, unless you are fluent in Arabic...
suite101.com
This article highlights the merits of polygon modeling but also illustrates how nurbs modeling can be a beneficial approach - especially when modeling organic entities. Nurbs use less geometry without becoming faceted when zoomed in on. According to this article, spline or patch based modeling makes animation and controling its deformation easier because you don't have any issues of unwanted weighting being allocated to incorrect cv's.
Wednesday, 17 March 2010
Nurbs patch modelling - Stitch Tool

Been playing with nurbs patch modelling, and having difficulty getting surfaces to connecting two surfaces together to give an organic transition associated with the machined object I am currently modelling. The stitch tool will join and blend two objects together. You can adjust the weighting so that one surface will change shape to match the other and vice versa. In the image above I've managed to stitch two cylinders together. As you can see the shape of the smaller cylinder has gone from cylindrical to square to accommodate the larger cylinders aperture.
Once the surfaces are stiched you can attach the surfaces togegher, so the surface becomes one. The nurbs shape can then be converted to a poly mesh, and when smoothed appears exactly the same as the nurbs.
Thursday, 18 February 2010
Poly Smooth and Edgeflow
Maya - Intro to Smooth Proxy from JohnSka7 on Vimeo.
Been playing with this usb man model, and trying to find the best way to achieve a nice smooth mesh that appears like its been made in a machine. The head piece comprises of two attached spheres, but getting it to look smooth has posed a few problems regarding edgeflow. I need a solution that doesn't require moving the cv's around too much as this will create bumps in the mesh and make the whol thing look like its been in the wars.
This is pretty elementary in terms of modelling but the simplicity of this model gives me a good opportunity to try out a number of techniques and hopefully weavel out the most efficient workflow.
Subscribe to:
Posts (Atom)